Direct connection to PC


1. Overview

This guide explain how to connect a WE500 to a PC for the setting up.

The connection is made through an ethernet cable from the WE500 to a PC.
The default IP address of the WE500 is 192.168.1.160.
The IP address of the PC must be configured as 192.168.1.X, in this case we will use the IP address 192.168.1.2 .
To interconnect the PC with the WE500 is necessary to configure a network as indicated below:
  • Mask: 255.255.255.0
  • Gateway: 192.168.1.1
  • DNS: 8.8.8.8
  • Broadcast: 192.168.1.255 (if required)

Note

If it is required to connect the WE500 to a network, it is suggested to contact the network administrator or refer to the manuals of the devices which compose the network.

2. Windows

Note

It is recommended to save a configuration back-up of the network before going to modify it.
To restore the previous network configuration just follow the same procedure but using the back-up settings.

2.1 Windows XP

  1. Connect the WE500 to the own PC through a ethernet cable and turn it on.
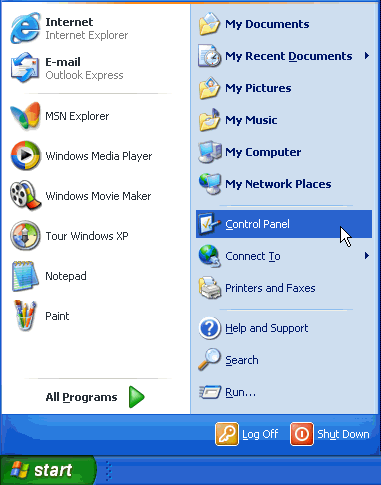
  2. Open the Control panel from the Start menù.
../_images/win_xp_01.png

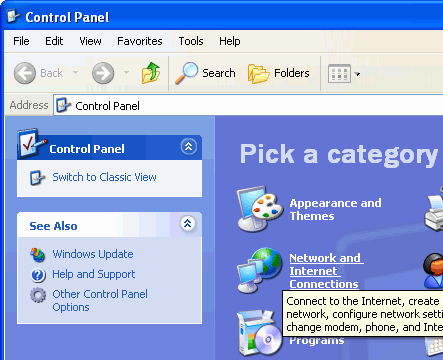
  1. Click on the option Network and Internet connections.
../_images/win_xp_02.png

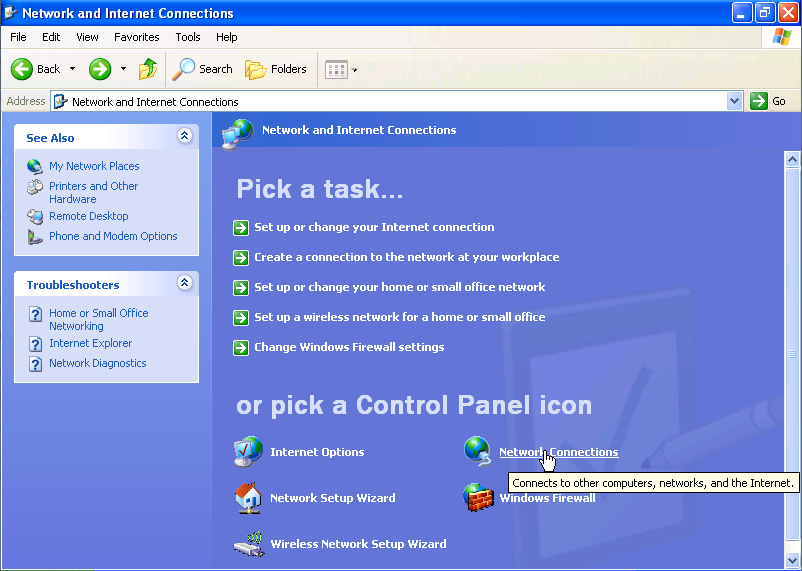
  1. Click on the option Network connections.
../_images/win_xp_03.png

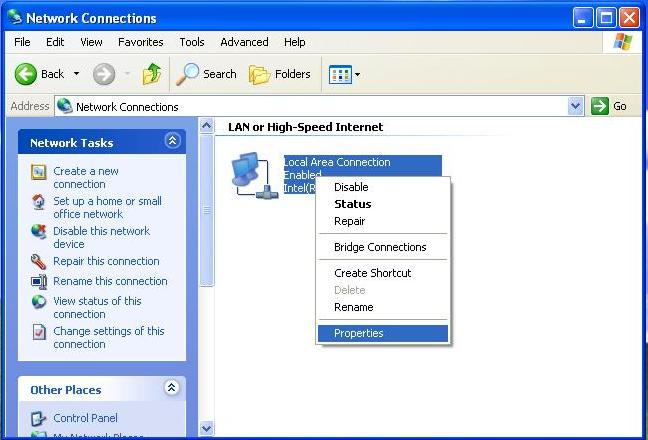
  1. In the window Network connections, right click on the network in use.
  2. Enter the section Properties.
../_images/win_xp_04.png

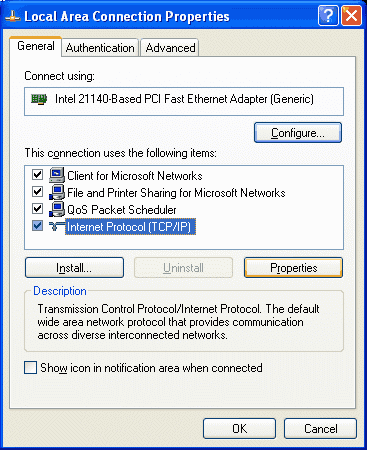
  1. In the window Network properties, select the element Internet protocol (TCP/IP) from the list displayed.
  2. Having the element Internet protocol (TCP/IP) still selected, click on the button Properties.
../_images/win_xp_05.png

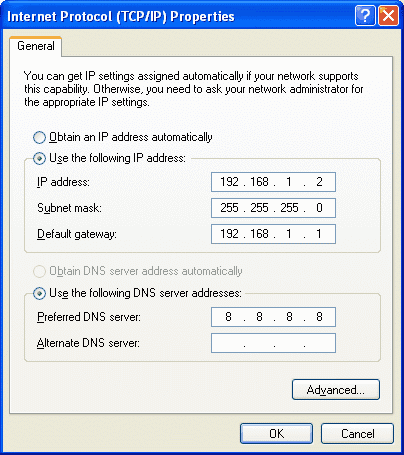
  1. In the window Internet protocol (TCP/IP) properties, enable the option Use the following address and fill in the fields as below.
    • IP address: 192.168.1.2
    • Subnet mask: 255.255.255.0
    • Default gateway: 192.168.1.1
  2. Enable the option Use the following DNS server addresses and fill in the fields as below.
    • Preferred DNS server: 8.8.8.8
../_images/win_xp_06.png

  1. Save the changes using the button OK.

  2. Close the window Network properties with the OK button.

  3. Close the window Network connections.

  4. At this point it is possible to configure the WE500 using the browser.

    As specified in the chapter 4. Logging in of the WE500 quick start guide.

Note

If in the network is available a router or another device that acts as a DHCP server, in other words provides automatically the IP address, the gateway and the DNS, it is necessary to set up also the fields “default gateway” and “DNS server” according to the configuration of those devices.
It is recommended to refer to the manuals of the devices network or to contact the network administrator.

2.2 Windows 7

  1. Connect the WE500 to the PC through an ethernet cable and turn it on.
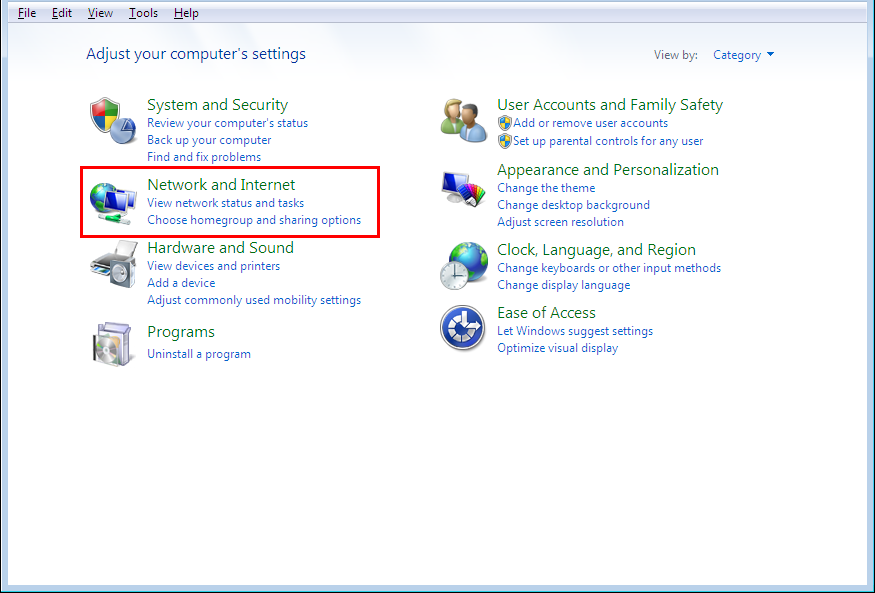
  2. From the Start menù, open the Control panel and select the option Network and Internet.
../_images/win_7_01.png

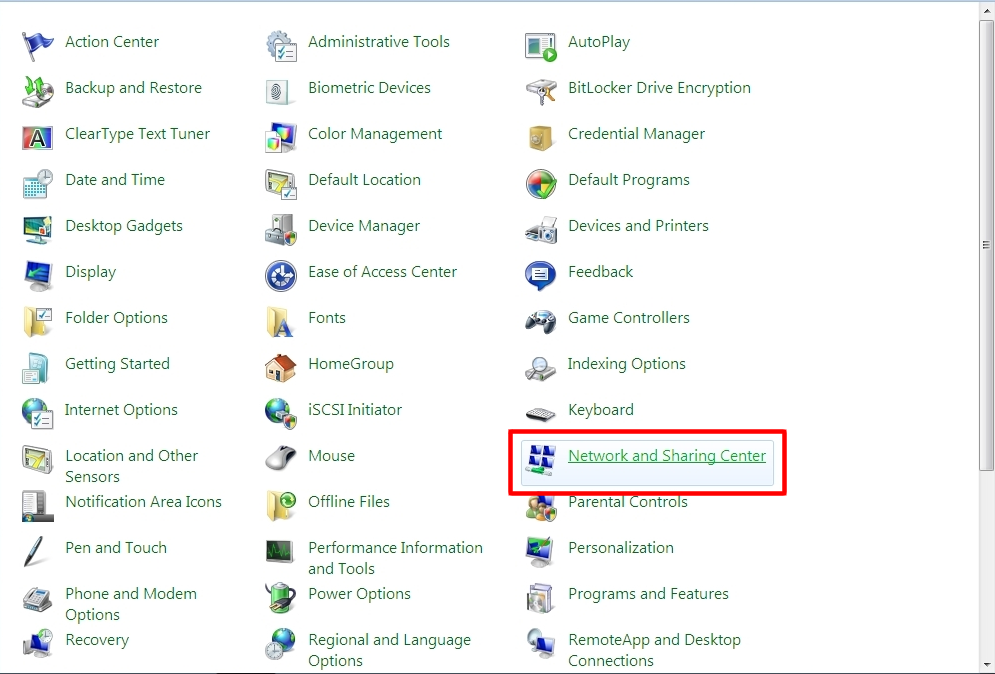
  1. In the window Network and internet, select the option Network and sharing center.
../_images/win_7_02.png

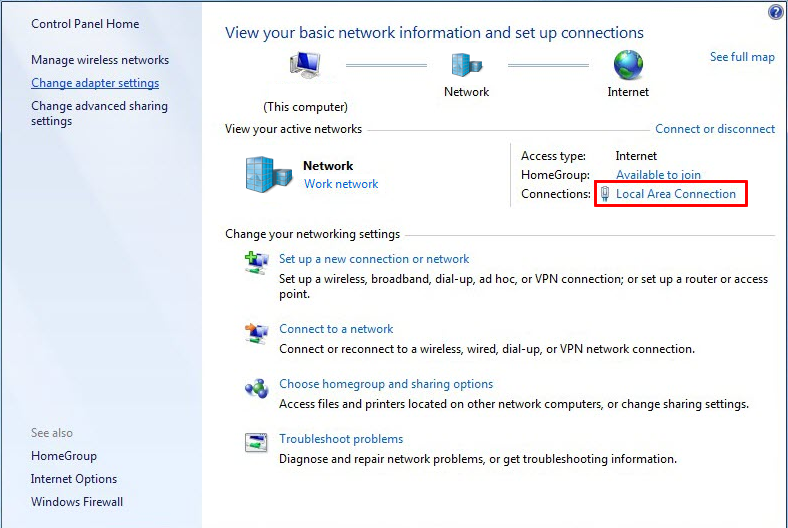
  1. In the window Network and sharing center, click on the link inside the field Connections.
../_images/win_7_03.png

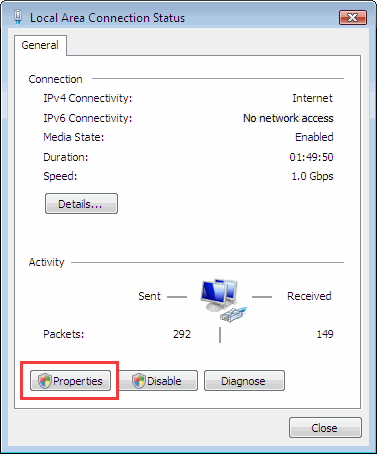
  1. In the window Network status, click on the button Properties.
../_images/win_7_04.png

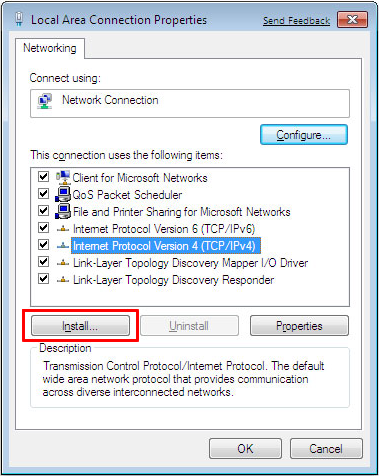
  1. Select the element Internet protocol version 4 (TCP/IP), from the list in the window Network properties.
  2. Having the element Internet protocol (TCP/IP) still selected, click on the button Properties.
../_images/win_7_05.png

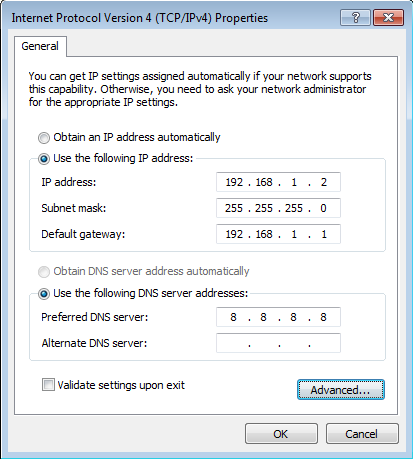
  1. In the window Internet protocol (TCP/IP) properties, enable the option Use the following address and fill in the fields as indicated below.

    • IP address: 192.168.1.2
    • Subnet mask: 255.255.255.0
    • Default gateway: 192.168.1.1
  2. Enable the option Use the following DNS server addresses and fill in the fields as indicated below.

    • Preferred DNS server: 8.8.8.8
../_images/win_7_06.png

  1. Save the changes and click on the button OK to close the window Internet protocol version 4 (TCP/IP) properties.
  2. Press the button OK to confirm the changes and close the window Network properties.
  3. Close the window Connection status using the button Close.
  4. Close the window Network and sharing center.
  5. Now is possible to set up the WE500 through a browser.
    As specified in the chapter 4. Logging in of the WE500 quick start guide.

Note

If in the network there is a router or another device that work as a DHCP server, in other words provide automatically the IP address, the gateway and the DNS, is indispensable to set up also the fields “default gateway” and “DNS server” in accord with the configuration of those devices.

It is recommended to consult the manuals of the devices network or to contact the network administrator.

2.3 Windows 8 / 8.1

  1. Connect the WE500 to the own PC through a ethernet cable and turn it on.

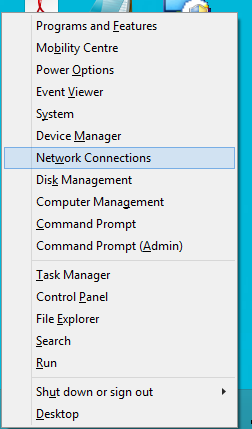
  2. Press the buttons Logo Window + X on the keyboard.

  3. Select the option Network connections.
../_images/win_8_01.png

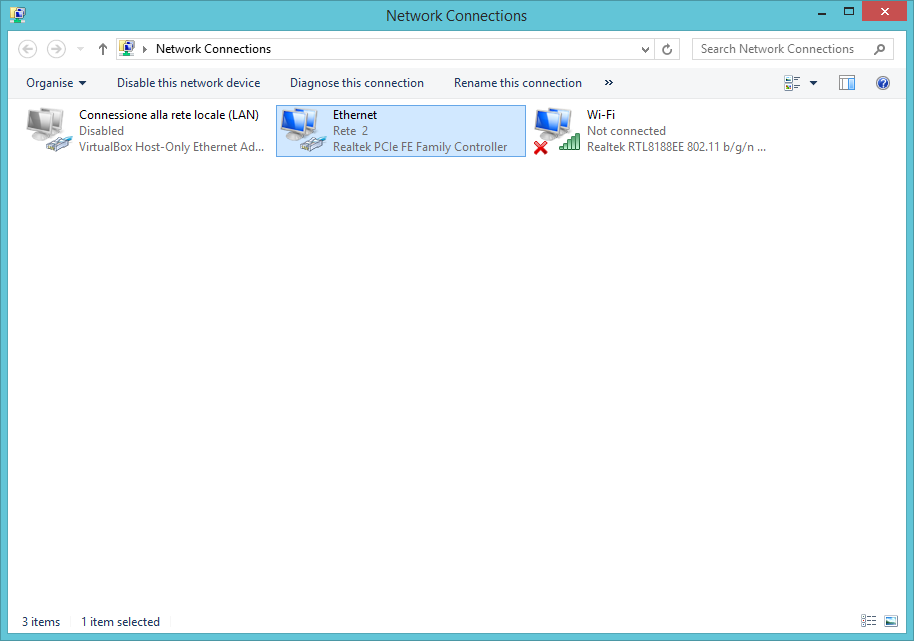
  1. In the window Network connections, select and right click on the network in use.

  2. Enter in ti the Properties.
../_images/win_8_02.png

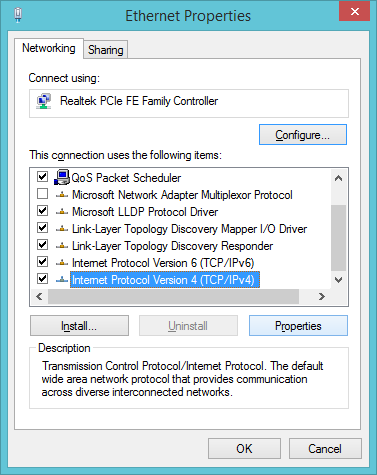
  1. In the windows Network properties, select the element Internet protocol version 4 (TCP/IP) from the list.

  2. While the element Internet protocol (TCP/IP) is still selected, click on the button Properties.
../_images/win_8_03.png

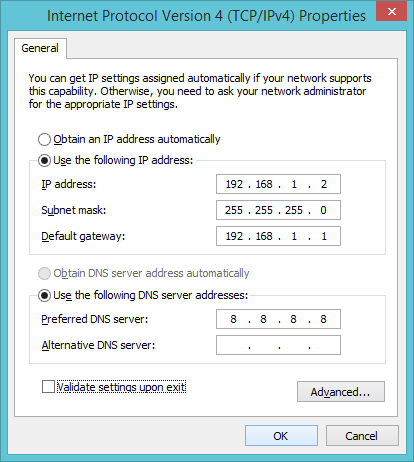
  1. In the window Internet protocol (TCP/IP) properties, enable the option Use the following address and fill in the fields as indicated below.
    • IP address: 192.168.1.2
    • Subnet mask: 255.255.255.0
    • preferred gateway: 192.168.1.1
  2. Enable the option Use the following DNS server addresses and fill in the fields as indicated below.
    • Default DNS server: 8.8.8.8
../_images/win_8_04.png

  1. Save the changes with the button OK.

  2. Press the button OK to confirm the changes and close the window.

  3. Close the window Network connections.

  4. At this point is possible to set up the WE500 by the browser.

    As specified in the chapter 4. Logging in of the WE500 quick start guide.

Note

If in the network there is a router or another device that work as a DHCP server, in other words provide automatically the IP address, the gateway and the DNS, is indispensable to set up also the fields “default gateway” and “DNS server” in accord with the configuration of those devices.

It is recommended to consult the manuals of the devices network or to contact the network administrator.


3. Mac OS X

  1. Connect the WE500 to the own PC through a ethernet cable and turn it on.

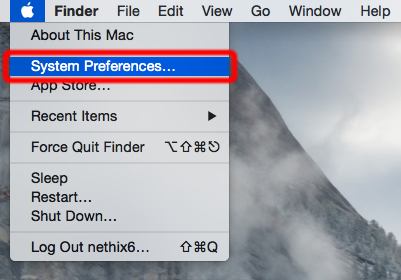
  2. click on the apple logo on the upper left side of the screen.

  3. Select System preferences.
../_images/mac_os_x_01.png

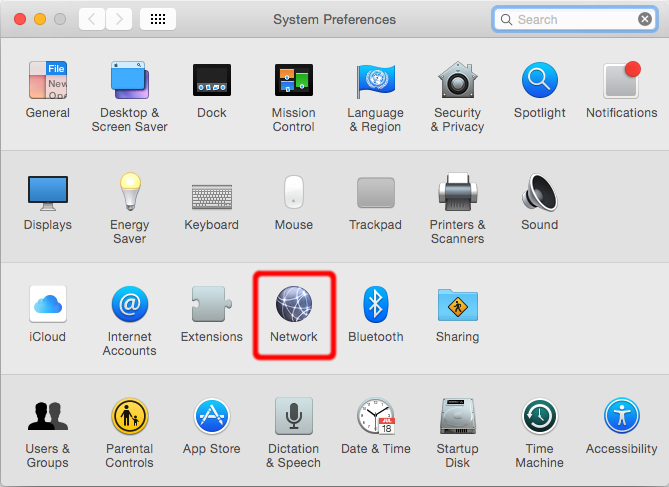
  1. In the window System preferences, click on Network.
../_images/mac_os_x_02.png

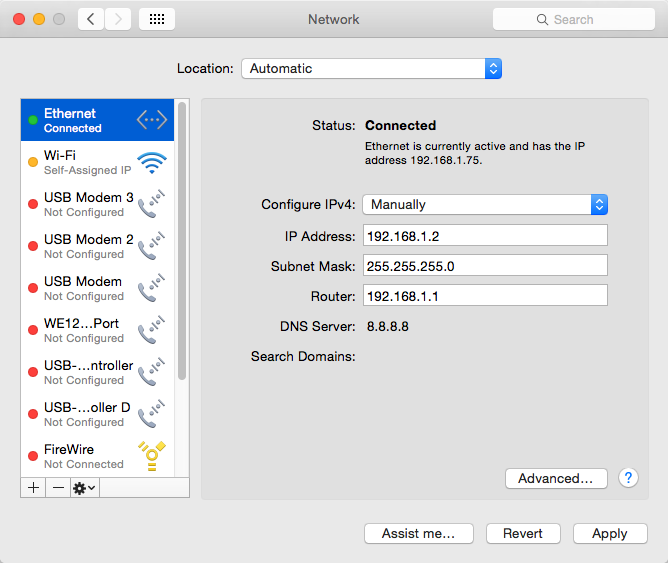
  1. In the window Network select the connection in use, from the list on the left side of the window.

  2. Using the button clockwork at the bottom of the list, duplicate the connection just selected and name it for an easy recognition.

  3. In the left side list, select the new connection just created

  4. On the right side of the window, fill in the fields as indicated below:
    • Configure IPv4: Manually
    • IP address: 192.168.1.2
    • Subnet mask: 255.255.255.0
    • Router: 192.168.1.1
  5. Save the configuration with the button Applay, on the bottom right side of the window.
../_images/mac_os_x_03.png

  1. Close the window Network.

  2. Close the window System preferences.

  3. At this point is possible to set up the WE500 by the browser.

    As specified in the chapter 4. Logging in of the WE500 quick start guide.

Note

If in the network there is a router or another device that work as a DHCP server, in other words provide automatically the IP address, the gateway and the DNS, is indispensable to set up also the fields “default gateway” and “DNS server” in accord with the configuration of those devices.

It is recommended to consult the manuals of the devices network or to contact the network administrator.


4. Linux

To set up a new network interface and manage the existing networks, is requsted to log-in as a super-user or alternatively to use the command sudo.

Below are listed the commands for a super-user, therefore without the prefix sudo.
  1. Connect the WE500 to the own PC through a ethernet cable and turn it on.

  2. Check the existing ethernet interface.
ifconfig -a

  1. Create a new ethernet network interface with the below parameters.
ifconfig ethX 192.168.1.2 netmask 255.255.255.0 broadcast 192.168.1.255

  • In the name of the interface, insert an available interface number instead of the X.

  1. Disable the already existing ethernet interface.
ifconfig ethY down
  • In the name of the interface, insert the number of the already enabled interface.

  1. Enable the interface just created.
ifconfig ethX up

  1. At this point is possible to set up the WE500 by the browser.

    As specified in the chapter 4. Logging in of the WE500 quick start guide.

Note

If in the network there is a router or another device that work as a DHCP server, in other words provide automatically the IP address, the gateway and the DNS, is indispensable to set up also the fields “default gateway” and “DNS server” in accord with the configuration of those devices.

It is recommended to consult the manuals of the devices network or to contact the network administrator.