../_images/we200_remote_access.png

Remote Access


1. Overview

In the systems managed by Software SCADA-HMI, it’s sometimes required to access several devices from the same central point. The main difficulties, that may be faced in such application,could be the following:

  • Difficulty in reaching the device. In many cases the network of the SCADA-HMI is not the same of the RTU/PLC to be controlled; thus it’s necessary to establish a secure and independent connection, that doesn’t require any additional operation by the user.
  • The devices to be controlled, require the use of a serial/USB port. In case of RTU/PLC without relevant network interface, it’s necessary to communicate with them through their serial ports or USB. Considering the fact, that the control-software is far from the monitored devices, it’s necessary to find a secure and easy-to-use system, suitable to simulate a wired connection.

WE200 allows to solve above mentioned problems in few steps and without any particular technical skills of the user.


1.1. How it works

On the following sections it’s described, how to configure WE200 and the software QuickTunnel in order to get a usable and functional system. Once the configuration is completed, the Remote Access function will work as follows:

  • The QuickTunnel software connects via VPN the PC with the Nethix Portal
  • The QuickTunnel software creates some virtual serial ports on the PC, where it’s installed. These ports (instead of referring to a physical port available in the PC) are IP addresses (reachable by the VPN), that will be recalled by QuickTunnel. The PC recognize them as physical serial ports and make them available for any software, that will require them
  • WE200 gets connected to the Nethix Portal via VPN. From now on the WE200 and the PC are parts of the same VPN network and are able to communicate between them as if they were wired
  • WE200 opens its physical serial ports to the PC, that can reach it from inside the VPN network
  • When a SCADA-HMI system (or any other software, which requires the use of a serial port) is launched on the PC of the controlling station, it requires to select a serial port, where is supposed to be connected the device/machinery to be controlled. In this case it should be selected the virtual serial port created by QuickTunnel
  • All the traffic generated by the SCADA-HMI system is sent to the WE200 through Internet connection, inside the VPN network (in a secure way)
  • Once received the data, WE200 acts as a bridge to its physical serial ports, forwarding the traffic generated by the SCADA-HMI system to the connected devices
  • In the same way, when the monitored devices return their feedbacks, the WE200 gets the data received by its physical serial ports and forward them to the IP address of the PC in the control station, using the VPN connection
  • The QuickTunnel software grants that the data sent by WE200 is forwarded to the virtual serial ports and then to the SCADA-HMI system.

2. Before you start

In order to get the best performance in the remote access function of WE200, it’s necessary to have:

  • The VPN service activated on Nethix Portal
  • The Software QuickTunnel

2.1. VPN

The most secure and simple way to let the SCADA-HMI system reach the network of the device to be monitored, is to use a VPN connection. The VPN allows in fact to bypass any restrictions by the network provider (firewalls), and to create an independent and secure network.

Nethix offers its own VPN service, based on Nethix Portal. This allows the user to manage its own VPN network in a very easy and simple way, without requiring any particular skills.

Note

For further information about the account activation on Nethix Portal, please contact Nethix technical support.

Beside the account activation on Nethix Portal, it’s required that both communicating parties (i.e. the WE200 on one side and the PC, where the SCADA-HMI software runs on the other side) have a mutual compatible VPN client. WE200 has a VPN client, which is compatible with that of Nethix Portal and with any other VPN Server that uses the OpenVPN standard. The activation of the VPN service on the WE200 is therefore immediate, as described on the following sections.

In order to prepare the PC with above mentioned VPN client, it’s enough to download the QuickTunnel software.

Note

For applying a different type of VPN, please contact Nethix technical support.

2.2. QuickTunnel

QuickTunnel is a free software, developed by Nethix (click here to download and here for the manual). It allows to manage the list of WE200 devices associated to the account, the VPN connection towards one or more domains and the configuration of the virtual serial ports to be configured on the PC, that runs the SCADA-HMI software, in order to communicate with the monitored devices.

Once installed the software, as described on the relevant manual, it’s possible to configure the whole system in just a few clicks.


3. How to establish a VPN connection

In order to let the WE200 and the control station communicate together, it’s necessary that both of them are connected to the same VPN network, made available by Nethix Portal. The following simple and easy operations are to be followed:


3.1. How to connect WE200 to the VPN network

First of all, switch on the device and wait until it’s initialized (it takes about 3 minutes).

Entering the Local IP address of the WE200 it is then possible to reach the integrated Web interface. If the IP address has not been changed previously, WE200 answers at the 192.168.1.160. In case it’s not possible to establish the connection, please check the PC settings or check the dedicated section of the manual (How to restore the IP of WE200).

Once reached the Web interface of the WE200, it’s required to enter the Login-data in the device.

../_images/login6.png

These data are not the same used for the authentication on the QuickTunnel software and can be changed anytime from the WE200 interface. The default data are the following:

  • username admin
  • password admin

Entering the page Networking → Services → VPN of the Web Interface it’s possible to enable the service.

../_images/vpn_auto4.png

Having checked the field Enable, select the option Auto on the field VPN mode and click Save. The fields VPN Service URL and VPN Service port will be filled in automatically.

Then the WE200 will try to establish a VPN connection with the Nethix Portal server. The success and the quality of this operation ( i.e the speed and stability of the connection) depend directly from the selected network interface. WE200 offers in fact the following network interfaces, and each of them can be used for establish the VPN connection:

  • LAN
  • WIFI
  • HSPA/LTE

For further information on the connectivity of the WE200 see the relevant manual (WE200 Manual).


3.2. How to connect the PC to the VPN network

Once available a valid account on Nethix Portal and enabled the VPN connection on the WE200, it’s enough to download the free-of-charge software QuickTunnel and launch it, in order to connect the PC to the VPN network. At the login, please enter the same credentials used for entering the Nethix Portal.

../_images/login7.png

After the login, all the available WE200 associated to the account will be displayed. Selecting one of them, it’s possible to establish a VPN connection with the device and with all those available inside the same domain. On the left side of the interface, QuickTunnel will show the confirmation of the connection.

../_images/connected.png

To terminate, click on relevant icon

../_images/disconnect.png

or just quit from QuickTunnel.


4. Serial ports configuration

Once enabled the VPN network on the WE200 and on the controlling PC, only two steps are left before having the whole system working:

  • Enable the access remote function on the WE200 serial ports
  • Configure the virtual serial ports on QuickTunnel

4.1. How to enable the serial ports on WE200

Before proceeding by connecting physically the devices/machines to be monitored to a serial port/USB of WE200, it’s necessary to set some basic parameters. 
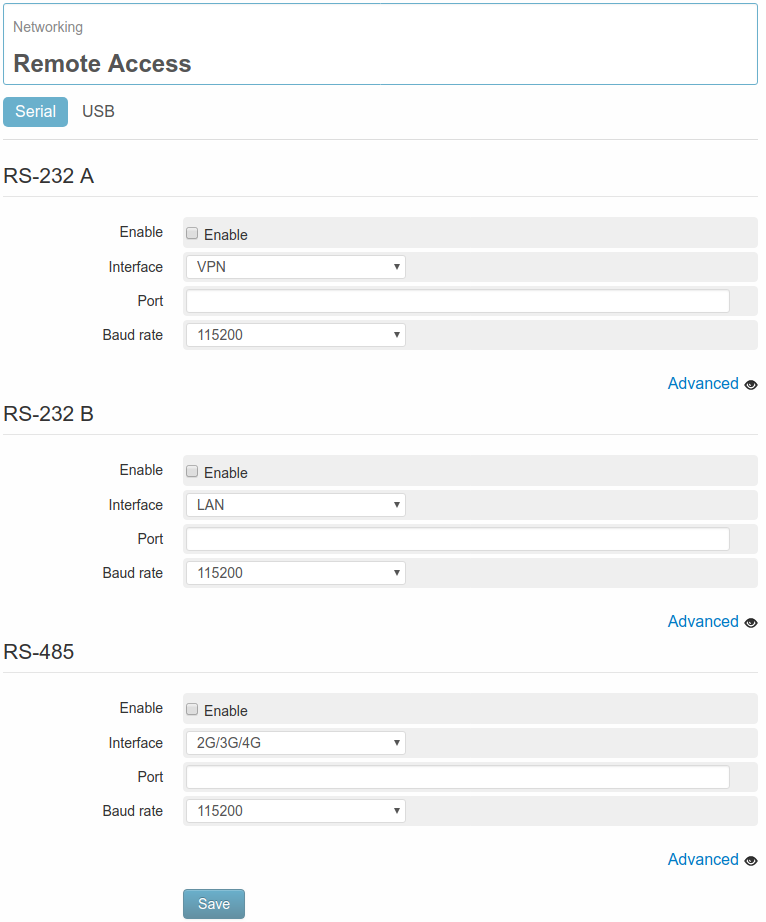
Once entered the Web Interface of WE200, go to page Networking → Remote Access and choose, according to own requirements, between Serial (to configure the ports RS232 and RS485) and USB. Remind that it’s also possible to enable the Remote Access service on all serials/USB simultaneously.

../_images/networking_remote_access_serial.png

At this point it’s possible to enable one or more serial ports/USB just flagging the relevant option Enable. The parameters to be configured for a proper functioning are:

  • Interface From the list it’s possible to select the network interface that WE200 shall use for the Remote Access function. In order to allow the software QuickTunnel to communicate with the WE200, select the option VPN
  • Port In this field enter a number ( at your choice) that will allow QuickTunnel to identify the right serial during the communication. This parameter just identifies the serial port being configured, allowing the user to select the same network interface ( from the field Interface) on more than one serial ports
  • Baud rate e Advanced The field Baud and the option Advanced allow to configure the typical parameters of a serial port ( speed, stop bit, etc.), that are described on the relevant section of the manual (Configuring Remote Access)

After the configuration click Save.

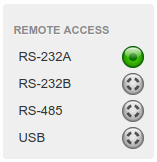
It’s confirmed that all operations have been successfully saved, only when on the panel status, available on the right side of the Web Interface of the WE200, the icon referred to the enabled port will become green.

../_images/remote_access_ok.png

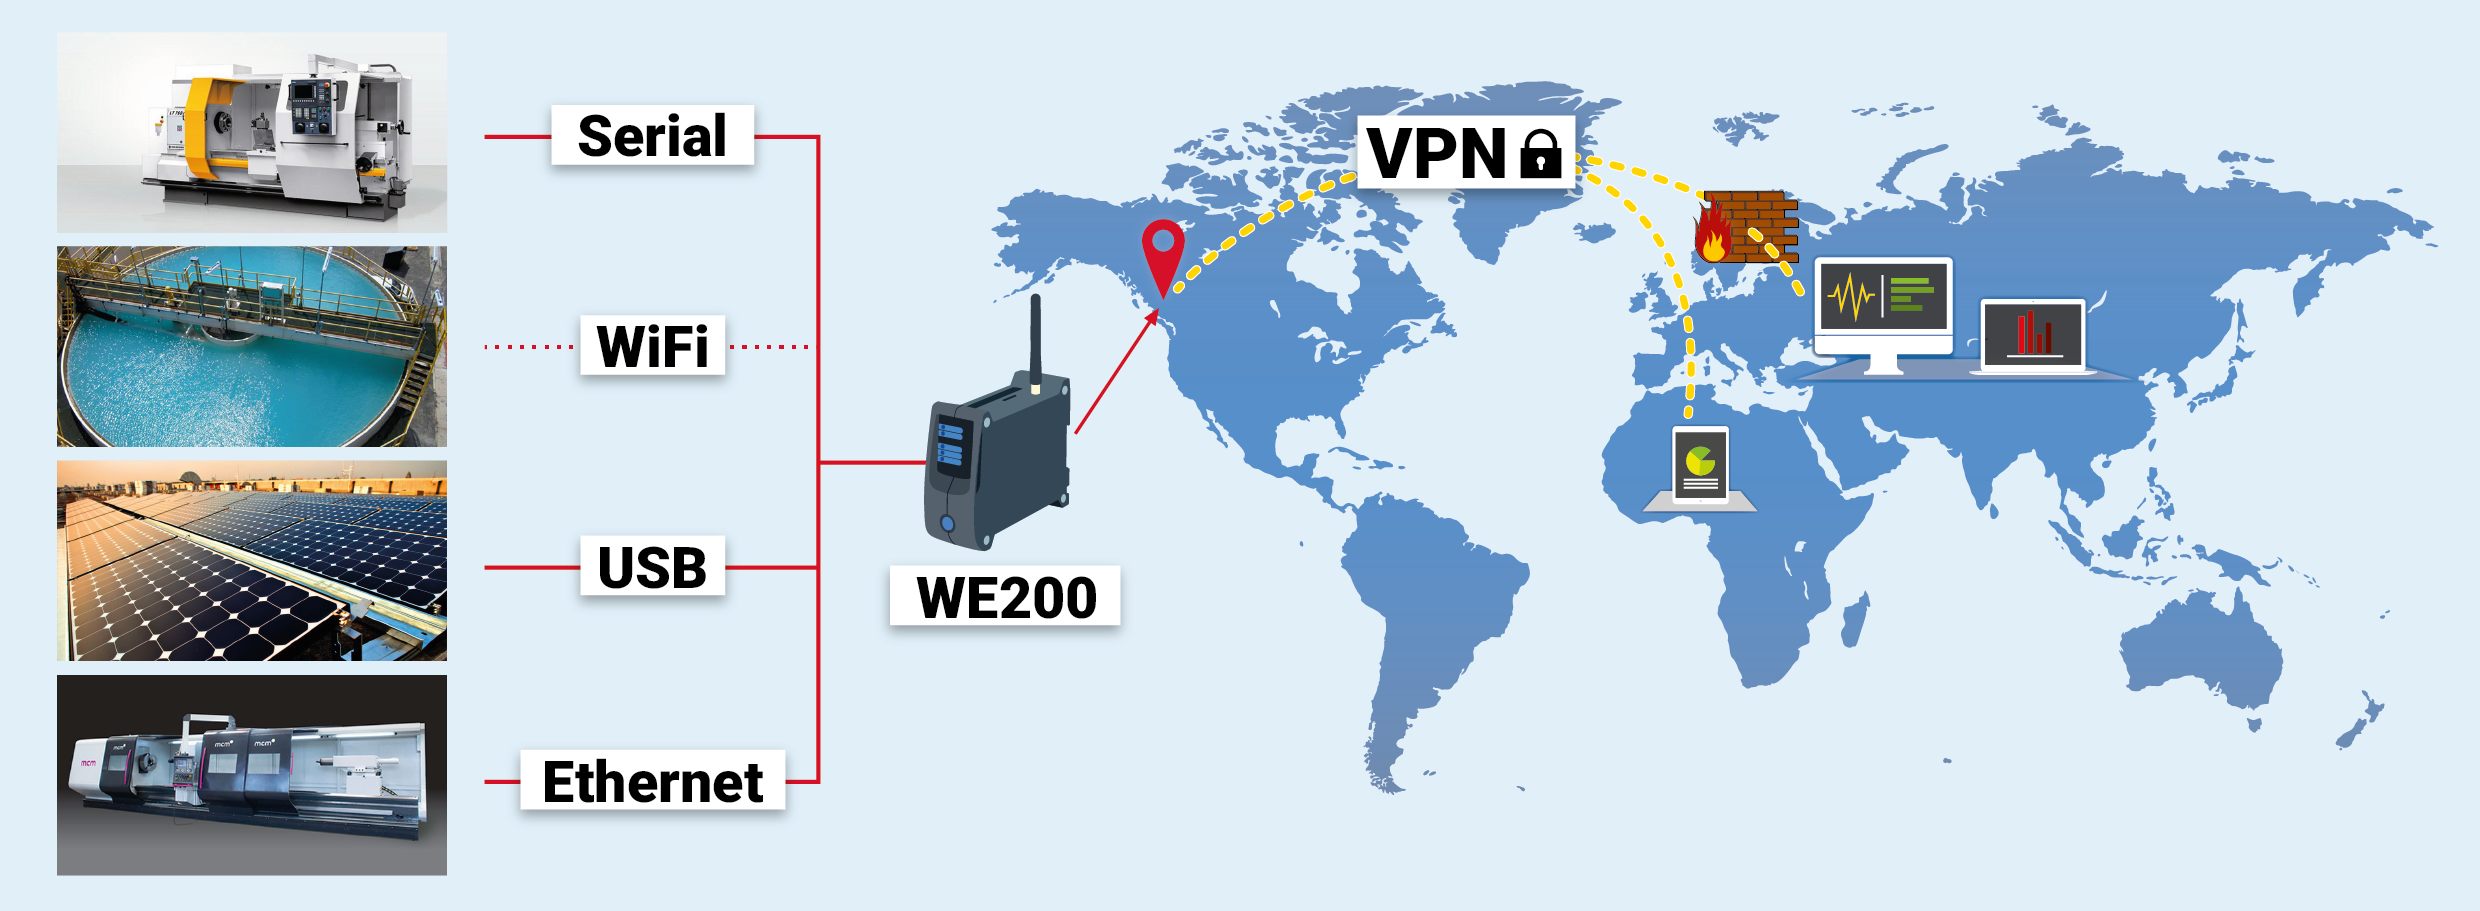
From this point the WE200 will perform exactly as an industrial gateway, being like a “bridge” between the controlling station and the machine to be controlled.


4.2. How to create virtual ports on the PC

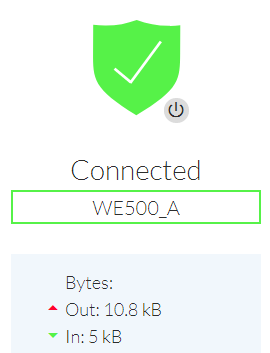
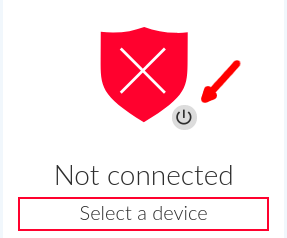
The creation of virtual ports on the PC is very simple and fast using the software QuickTunnel. Once installed and entered using the credentials of Nethix Portal (see manual Quick tunnel), search for the previously configured WE200 among the list of available devices, and select it in order to establish a VPN connection as described on paragraph 3.2.

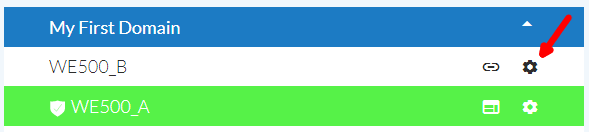
Once received the confirmation of the connection ( see relevant indicator on the left side of the interface) proceed with the creation of virtual ports, just clicking on the specific icon:

../_images/config_port.png

To add a virtual serial port, click on the icon indicated below.

../_images/add_icon1.png

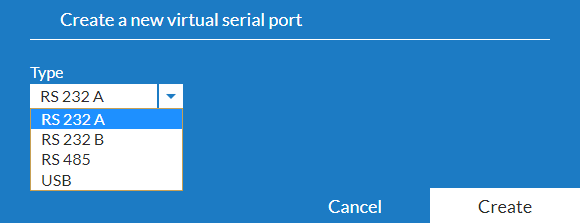
It’s then required to choose the physical port of the device to be monitored (the one/s configured on paragraph 4.1), choosing among following options available on the field type:

  • RS232A
  • RS232B
  • RS485
  • USB
../_images/select_port.png

Once selected the desired port, click on Create to proceed. 
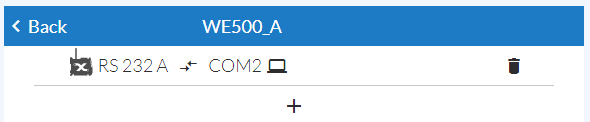
A virtual serial port will be created on the PC in use. This serial port will be then available on the list, as shown here below.

../_images/pc_virtual_port.png

From this point, all the traffic, generated on the virtual port available in the PC, will be sent in a transparent channel (regardless of the used communication protocol) to the device connected to the selected physical serial port, and vice versa.

Note

Terminating the software QuickTunnel the VPN connection is disabled and the created virtual ports canceled. At the restart of the software the VPN connection and the virtual serial ports will be restored automatically.