1. Overview
The WE500 is a versatile device. Its functionalities can be expanded or new ones added through several available plugins.
These plugins can be self-configuring, such as the sensor plugins, or can offer an easy and intuitive configuration. Plugins autonomously create all the variables, events and pages required for the desired functionality.
2. IoT Platforms
Through the following plugins it’s possible to integrate the WE500 with several IoT platforms. These plugins allow to send the variables’ values of the system and the device status to the platforms; from those it’s then possible to control and monitor the WE500.
2.1 Cumulocity

This plugin allows to interact with the Cumulocity.
After the plugin installation, as described on the Software manual, enter the page Administration → Cloud → Cumulocity.
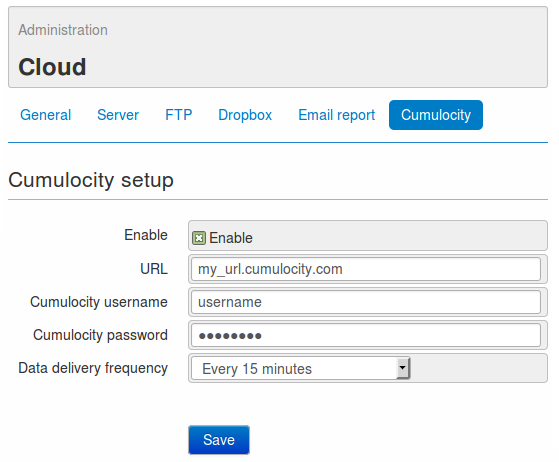
On this page it’s possible to set the following parameters:
- Enable: it allows to enable or disable the data sending to the Cumulocity platform
- URL: it’s the URL for entering the own reserved area of Cumulocity
- Username: the username used for accessing the platform
- Password: the password used for accessing the platform
- Data delivery frequency: sets the number of minutes between each data delivery by the WE500 to the Platform.
By clicking on the Save button, the WE500 will registered on the platform Cumulocity and starts sending variables.
Under the section data sending of the software manual is indicated how to enable variables to data sending and how to configure the data sending
The delivered data can be visualized on the platform Cumulocity on the page Device management → All devices → Measurements
The application note Cumolocity describes in detail how to configure WE500 and Cumolocity in order to use the different funcitonalities of this IoT plafform.
2.2 Carriots

This plugin allows to interact with the Carriots.
After the plugin installation, as described on the Software manual, enter the page Administration → Cloud → Carriots.
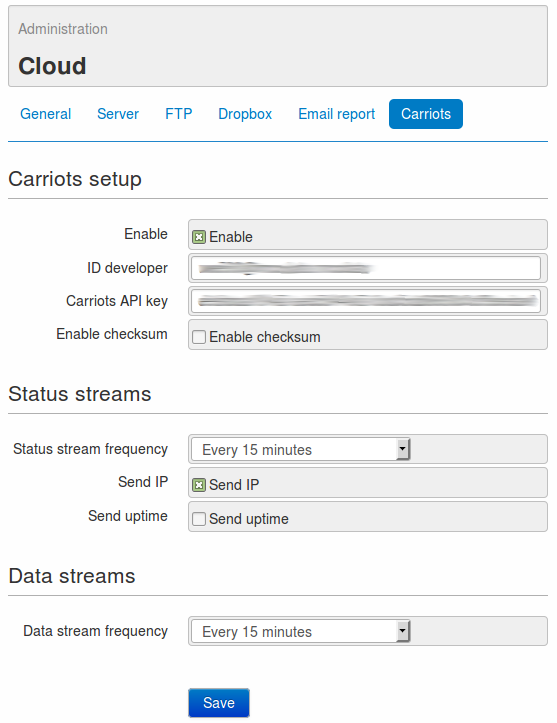
On this page it’s possible to set the following parameters:
- Carriots setup
- Enable: it allows to enable or disable the data sending to the Carriots platform
- ID developer: the ID developer is available on the control panel of Carriots, clicking on a device on the section Device Management → Devices
- Carriots API key: the API key is available on the control panel of Carriots under the section MY SETTINGS → My Account
- Enable checksum: if on the control panel of Carriots, on the configuration page of the device, a checksum is available, enable this field and enter the same value also on the Checksum field below.
- Status streams
- Status stream frequency: sets the number of minutes between each notification of the device status sent by the WE500 to the Carriots Platform
- Send IP: if enabled, it sends the own IP together with the status stream
- Send uptime: if enabled, it sends the uptime together with the status stream
- Data streams
- Data stream frequency: it sets the number of minutes between each delivery of the variables values to the clouds
By clicking on the Save button, the WE500 will registered on the platform Carriots and starts sending variables.
Under the section data sending of the software manual is indicated how to enable variables to data sending and how to configure the data sending
This tutorial describes a simple integration of the WE500 inside Carriots platform.
The delivered data can be visualized on the platform Carriots on the page Data Management → Data streams and Data Management → Status streams.
2.3 Evrythng

This plugin allows to interact with the Evrythng.
After the plugin installation, as described on the Software manual, enter the page Administration → Cloud → Evrythng.
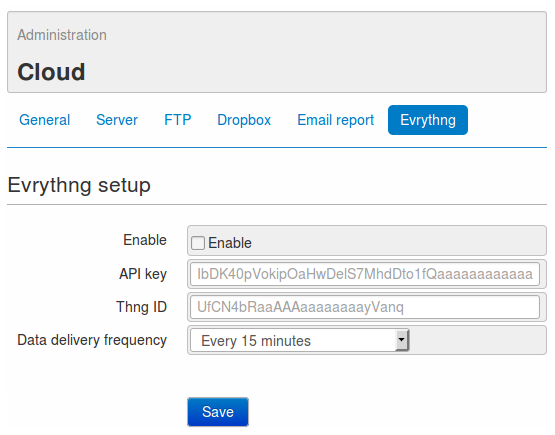
In questa pagina è possibile configurare i seguenti parametri:
- Enable: permette di abilitare o disabilitare l’invio dei dati alla piattaforma Evrythng
- API key: inserire la API key presente nel pannello di controllo di Evrythng
- Thng ID: L’ID del WE500 presente nel pannello di controllo di Evrythng
- Data delivery frequency: Con questo parametro si indica a WE500 ogni quanti minuti deve inviare i dati delle variabili alla piattaforma
By clicking on the Save button, the WE500 will registered on the platform Evrythng and starts sending variables.
Under the section data sending of the software manual is indicated how to enable variables to data sending and how to configure the data sending
All delivered data can be displayed on the Evrythng platform on the page Resources → Thng → WE500.
2.4 Cloud of Things

This plugin allows to interact with the Cloud Of Things Platform by Deutsche Telekom.
After the plugin installation, as described on the Software manual, enter the page Administration → Cloud → Cloud of Things.
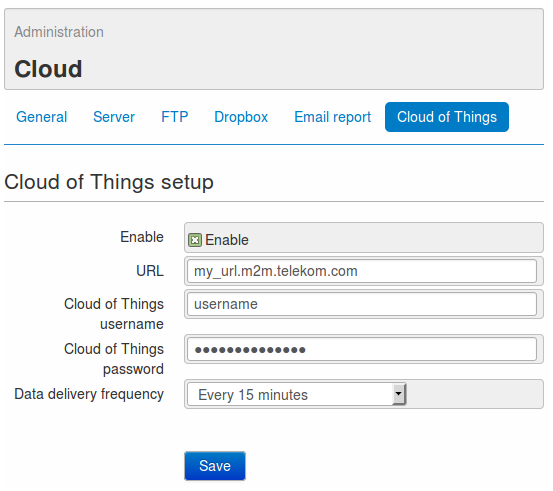
On this page it’s possible to set the following parameters:
- Enable: it allows to enable or disable the data sending to the platform Cloud of Things
- URL: it’s the URL for entering the own reserved area of Cloud of Things
- Username: the username used for accessing the platform
- Password: the password used for accessing the platform
- Data delivery frequency: sets the number of minutes between each data delivery by the WE500 to the Platform.
By clicking on the Save button, the WE500 will registered on the platform Cloud of Things and starts sending variables.
Under the section data sending of the software manual is indicated how to enable variables to data sending and how to configure the data sending
The delivered data can be visualized on the platform Cloud of Things on the page Device management → All devices → Measurements
3. Sensors
These plugins allow a very easy configuration and interaction of the WE500 with many different types of sensors; they also provide web pages for the graphical representation of the collected data.
3.1 Anemometer
This plugin creates the variables and the pages to interact with an anemometer and keep it monitored.
After the plugin installation, as described on the software manual and the connection of the anemometer on the analog input 1, enter the page Weather → Anemometer.
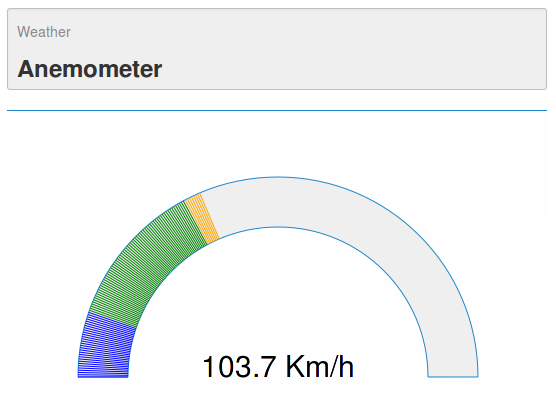
From this page it’s possible to monitor the wind force measured by the anemometer.
On the section Adminsitration → variables it’s possible to visualize the analog input variable called Anemometer, created by the plugin and associated with the analog input 1.
3.2 Wind vane
This plugin creates the variables and relevant web pages to interact with a wind vane and keep it monitored.
After the plugin installation, as described on the software manual and the connection of the wind vane on the analog input 1, enter the page Weather → Windvane.
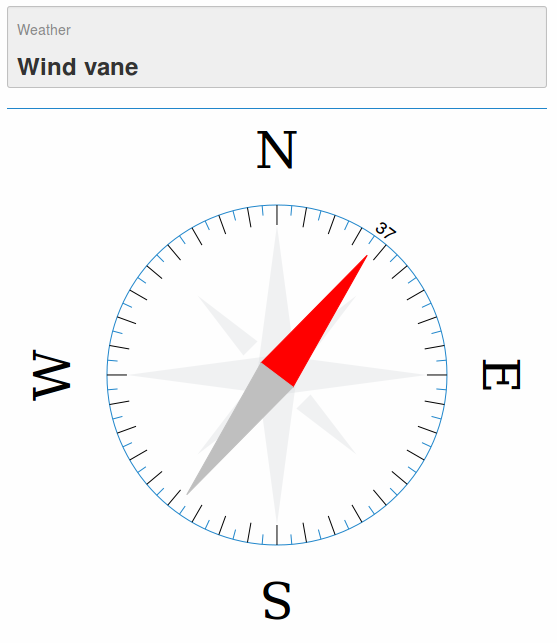
From this page it’s possible to monitor the wind direction recorded by the wind vane.
On the section Adminsitration → variables it’s possible to visualize the analog input variable called Windvane, created by the plugin and associated with the analog input 1.
3.3 NTC Sensor
This plugin creates the variables and the pages suitable to configure and monitor one or two NTC temperature probes.
After the plugin installation, as described on the software manual, enter the page NTC sensors → Configuration.
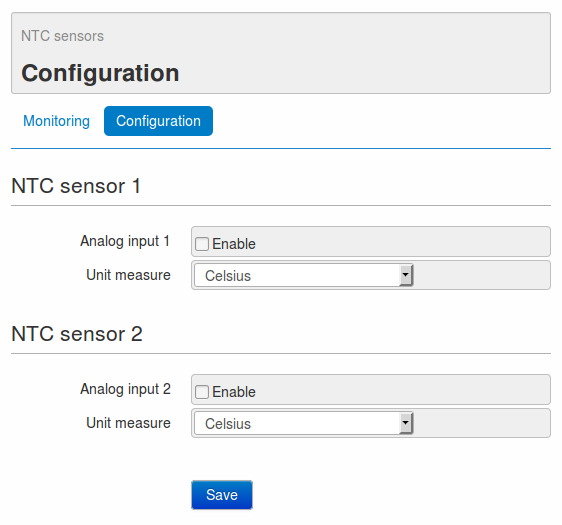
On this page it’s possible to enable one or both NTC probes by selecting Enable on Analog input 1 and/or Analog input 2 and setting the desired Unit measure.
After saving the configuration, the plugin will create 4 variables for each NTC probe. If, for instance, the first NTC probe is enabled, the following variables will be created:
- AI1: one analog input variable, associated with the analog input 1, where the NTC probe is connected
- Vsense1: one virtual variable, used to calculate the temperature
- Tteor1: one virtual variable, used to calculate the temperature
- Temperature1: one virtual variable, that indicates the temperature according to the selected unit of measure
After saving the configuration, enter NTC sensors → Monitoring.
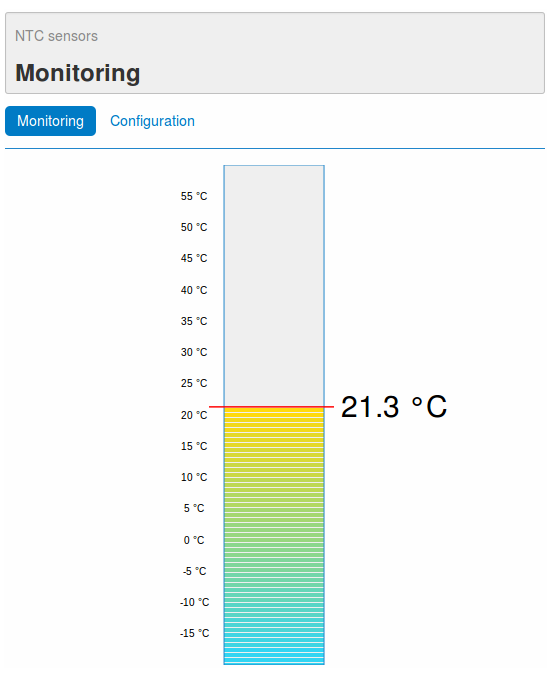
From this page it’s possible to monitor the configured NTC probes.